
 USA
 Brazil
 Germany
 France
 Italy
 Switzerland
 Sweden
 Spain
 Great Britain
 Norway
 Russia
 South Africa
 Japan
 New Zealand
 Australia

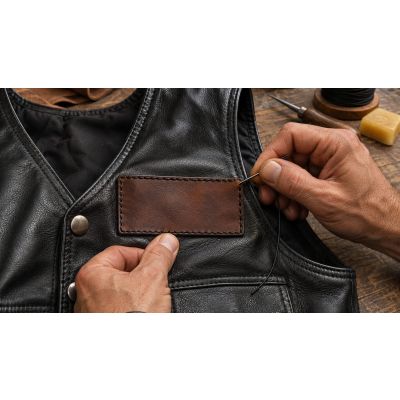
Short answer: sew patches on; do not iron them on. Heat can mark or shrink leather, and iron-on glue usually lets go once the leather flexes. A leather needle with strong thread, stitched by hand, gives the longest-lasting result. For thick vests or large patches, a leather shop with a heavy-duty machine is the safe option.
Which method to use
| Method | Durability | Risk to the leather | Best for |
|---|---|---|---|
| Hand sewing | High | Low if holes are spaced well | Most vests and most patches |
| Machine sewing | High | Medium; needle holes and lining can be a problem | Large or many patches, thick vests, done by a shop |
| Fabric or leather glue | Low to medium | Medium; can stain or stiffen | Temporary holding while you sew |
| Iron-on backing | Low | High; heat can mark or shrink the leather | Not recommended on leather |
The pattern here is clear: sewing wins on every durability measure. Glue has a place only as a temporary hold, and iron-on is the method most likely to cause harm.
What you need
- Leather needles with a cutting or wedge point, which pass through leather without tearing it. Regular sewing needles will bend.
- Strong thread, waxed polyester or nylon, in a color that matches the patch border or contrasts on purpose.
- A thimble or a leather palm, to push the needle through.
- Clips or tape, instead of pins, because pins leave holes in leather that do not close.
- An awl or a stitching punch, if the leather is thick, to start the holes.
- Chalk or a removable marker, a ruler and a paper template.
- Scissors, for trimming thread ends.
Practice on a scrap piece of similar leather first. Your leatherwork supplier's guide will list the needle and thread sizes that suit your leather.
Step by step: sewing a patch by hand
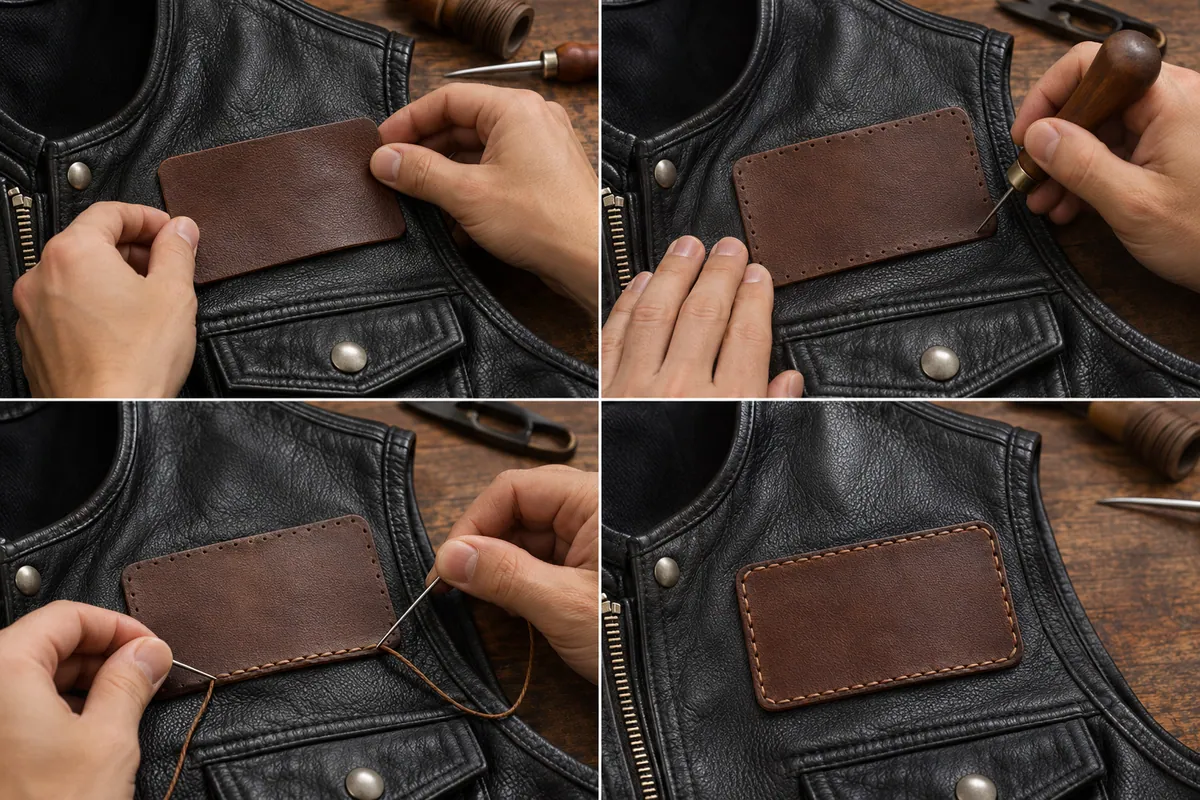
- Plan the position. Read our guide on patch placement and etiquette first, then cut a paper template of the patch and tape it where it will go.
- Mark the corners and center. Use chalk or removable marker, and step back to check the position with the vest on a hanger or worn.
- Hold the patch. Use clips or masking tape around the edge. A thin line of removable fabric glue on the back is fine as a temporary hold.
- Start the holes if needed. On thick leather, pre-punch holes along the patch edge with an awl, about 1/8 inch in from the border.
- Thread the needle with about 3 feet of thread, doubled, and knot the end. Start from the underside or inside the patch edge so the knot is hidden.
- Stitch. A saddle stitch, using two needles on one thread, is the strongest. A simple running stitch, or a whip stitch around the border, is easier and works for light patches. Keep stitches evenly spaced, roughly 1/8 to 1/4 inch apart. Closer than that perforates the leather like a postage stamp.
- Pull gently and evenly. Snug is right. Over-tight stitches pucker the leather.
- Finish. Knot twice on the inside, trim the ends and, if you like, a drop of clear glue on the knot keeps it from loosening.
Test the whole method on a spare panel before you start on the vest. The same check works on any vest: stitch a scrap panel to confirm the stitch length and tension before touching a finished garment.
Machine sewing and when to use a shop
A home machine will not always cope with leather. Thick vests, linings, multiple layers and large patches can bend needles, skip stitches or jam the machine. A shop with a heavy-duty or walking-foot machine and the right needles is a better choice when:
- The patch is large, such as a full back patch.
- The vest has a thick lining or padding.
- You want straight, even stitching on a flat panel.
Ask a shop these questions: Do you work with leather regularly? What needle and thread will you use? Will you stitch through the lining, or open it up? What happens if a needle hole shows? Needle holes cannot be undone, so measure twice.
Why iron-on and glue fail
- Heat: an iron hot enough to melt the adhesive can darken, shrink or stiffen the leather. Finishes can mark even at moderate heat.
- Flex: leather moves as you wear it, and rigid adhesive layers crack and peel at the edges.
- Finish: many leathers have a surface coating that adhesives do not bond to well.
- Weather: moisture and sweat weaken glue over time.
If a patch must stay put while you stitch, use clips or a light temporary adhesive, then sew.
Placement and mistakes to avoid
- Stitching across a seam. It weakens the seam and the patch lifts at the join. Keep the patch on one flat panel.
- Covering a pocket or zipper. Patches there stop the pocket working and wear quickly.
- Using pins. They leave permanent holes.
- Stitching too close together. A tight row of holes can tear out like a perforation line.
- Skipping the test. A scrap panel shows how the thread, needle and spacing will look.
- Uneven placement. Check position with the vest worn, not just flat on a table.
Stitch types compared
| Stitch | Strength | Difficulty | Notes |
|---|---|---|---|
| Saddle stitch | Highest | Moderate | Two needles, one thread; if one stitch breaks the rest hold |
| Running stitch | Medium | Easy | Fast, but a broken thread can run along the line |
| Whip stitch | Medium | Easy | Wraps around the patch edge; good for finished borders |
| Backstitch | High | Easy to moderate | A good compromise between strength and simplicity |
If you are new to leatherwork, backstitch is a sensible first choice. Whichever you use, keep the stitch length even and finish with a double knot.
Removing a patch
If you change your mind, unpicking is possible, but it leaves holes. Cut the stitches from the back with a seam ripper, lift the patch gently and pull out thread pieces with tweezers. Holes from needles usually stay visible. A new patch of the same size, or a slightly larger one, can cover them. Never pull a patch off before removing the threads, because that tears the leather.
Cleaning around patches
Once patched, the vest needs a little care. Our guide to cleaning and conditioning a leather motorcycle vest covers how to treat areas around patches and embroidery. Choose a size with enough room that the weight of patches does not pull the shoulders, using our leather vest size chart guide. For suits and jackets, see embroidery, printing and patching on riders' suits.
FAQs
Can you iron patches on a leather vest?
It is not recommended. Heat can mark or shrink leather, and iron-on adhesive usually peels as the leather flexes. Sew the patch instead.
What thread do you use to sew on leather?
Use strong waxed polyester or nylon thread with a leather needle. Cotton thread wears faster and rots with sweat and weather.
Can you glue patches on leather?
Glue can hold a patch temporarily while you sew, but it is not a lasting fix on its own. It can stain or stiffen leather and fails with flex and moisture.
Can you sew a patch onto a lined vest?
Yes. You can stitch through the lining or open the lining seam to hide the thread ends. Through-lining stitching is simpler, but the stitches may show inside.
How do you remove a patch from a leather vest?
Cut the stitches from the back with a seam ripper, lift the patch and remove the thread ends. Needle holes will remain, so plan the new patch to cover them.
Need a base to work on? Choose a plain vest from men's leather vests with a flat panel for your patches. Leather Collection's workshop will sew on patches you supply, and can also make custom patches to your design.